DIY Halloween Lollipop Spiders | Mummy Crafts!

Hello Everyone,

I always love getting into the fall season when I get to create tons of crafts. It’s just something about the cool weather that makes me want to create. It is slightly early to be thinking about Halloween but, I just can’t help myself. Below is a video showcasing just 2 simple ideas that I had to decorate lollipops. These tutorials are fun for adults and kids alike. I hope you like them too. Also, I provide step by step instructions on how to assemble the crafts.

~Nika xoxo

For the mummy. I use a toilet paper roll. I start off by placing a bottom on the roll to make sure whatever we put inside doesn’t fall out.
Next, we take scraps of fabric or streamer and begin wrapping it around the roll to give the appearance of a mummy being wrapped. It Doesn’t have to be perfect and I actually like the frayed scruffy look of the mummy.
Finally, we place the googly eyes on with the glue gun to secure the eyes on the fabric. Make sure to leave the top part open to place the treats inside. After you can close it off or leave it open. These would be great for a party, handing out to trick or treaters or simply decorations around the house.

You can check out how to make the spider legs for the lollipops in the video below.

Small Target Haul!

I love shopping at Target, and finding these cute items at low prices is even better. No matter what I go to Target for I always end up finding stuff in the low-cost bins. I will be going back again to get more items for my Valentine’s Day crafts.

~Nika xoxo

DIY Holiday Wreath

20151115_154747355_iOS
What you are going to need:

Glue gun
Needle
Thread
Ribbon (I used 1″ & 7/8″ ribbon)
Cut the ribbon into 24+ 36″ strips (I used satin, organza and grosgrain)
Flatback pearls or other decorations
Fabric Stiffen

20151114_173819398_iOS

Here are my 36″ strips cut I made extra just in case

20151114_175314298_iOS

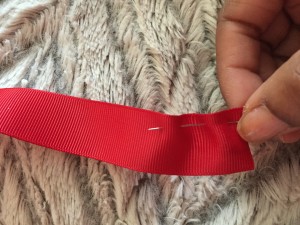
Take your needle and sew a running stitch like shown above all the way to the end of the ribbon.

20151114_181115338_iOS

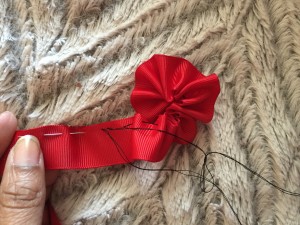
I pulled the ribbon to start the flower as I kept sewing along the running stitch

20151114_181546941_iOS 20151114_182240151_iOS
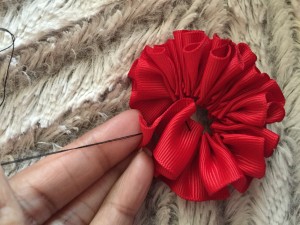
Once you are to the end pull to form a flower. When you pull the thread the ribbon will form a circle on its own.

Note: (if the ribbon turns the wrong way as you’re pulling it simply turn it the right way and keep forming the circle.)

20151114_183438431_iOS

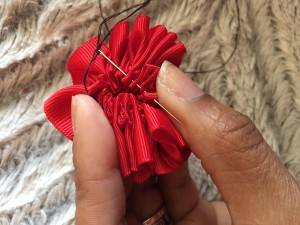
I took my needle through the ribbon several times along the inner circle to make sure it was extra tight and secure.

Now you want to follow the first 3 steps until all the flowers are formed.

20151115_015126329_iOS

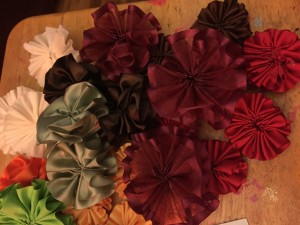
I used several different colors

20151115_143133201_iOS

Take a 36″ strip of ribbon tie in a knot at the top for hanging

20151115_144112848_iOS

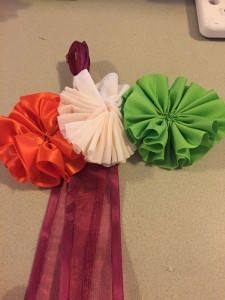
Now you want to begin placing the flowers. I started at the knot. I used hot glue to hold them together (you can sew them instead). Continue until you form a circle. Once you have all of the flowers placed like you want them. I completed mine with some flatback pearls and then I used some fabric stiffen that I purchased at Michael’s. You can purchase it from any hobby store. And….

20151115_154720224_iOS